Space to Grow
Asteroid Investigation
Obtaining an Accurate Position for the Asteroid
This part of the project assumes that you have set up Astrometrica using the settings outlined on the Configuring Astrometrica page.
Although you can see the RA and Dec of objects in your images simply by moving your cursor around the image in Astrometrica (see bottom of the Astrometrica screen), the positions are based on how well the telescope is configured and therefore are not useful for the extremely accurate position determinations you are trying to obtain through this project.
A much more accurate way to determine the position of the asteroid is to triangulate on the accurately known positions of the surrounding stars. This is where the USNO-B1.0 catalogue (which you selected in the preferences) comes in as it contains accurate positions for more than a billion objects.
However, before you begin, you should make sure that your MPCOrb database is up to date.
- Update MPCOrb database (not necessary every time - only really necessary when you have brand new data).
The MPCOrb database is a large database with the position information of all the known asteroids and comets. This data is constantly being updated as astronomers from around the world discover new asteroids and comets, and submit new information on known objects. The database originally downloaded through Astrometrica contains most of the information, but you should periodically download the updates so your database is current.
Once you are connected to the internet, select Internet » Update MPCOrb. This will pop up the following window.
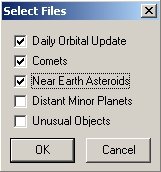
Figure 6: Select Files dialog.Select Daily Orbital Update, Comets and Near Earth Asteroids (the others are not necessary) and click OK. This will start the downloads and update the database. Depending on the speed of your internet connection and computer, this may take a little while.
If, when you try to update the MPCOrb database through Astrometrica, you receive the error message "Connection to Host cfa-ftp.harvard.edu failed: Connection Closed Gracefully", read this solution.
- Load the relevant image files.
Note: At this stage you should not resize any images or move them around the screen. Even though they are overlapping at the moment, leave them where they are.
- Match the objects in the Faulkes Telescope images to objects in the USNO-B1.0 catalogue.
Once you are connected to the internet, select Astrometry » Data Reduction. Click OK when the Coordinates window pops up (the numbers are taken from the header info on the actual image file and should be correct. There is no need to input a name). This identifies the central coordinates of the Faulkes Telescope images.
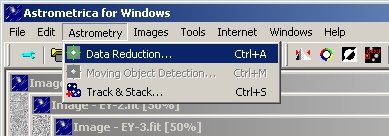
Figure 7: Click Data Reduction or press Ctrl+A.Astrometrica will now extract all of the objects in each of the Faulkes Telescope images. It will then connect to the internet and query the USNO-B1.0 catalogue to extract all of the objects near the central position of the Faulkes Telescope images. Astrometrica will then compare the positions for the objects it found in the images with the positions it finds in the USNO-B1.0 catalogue in order to match the objects.
Once it has finished, you will see that most of the objects in the image are circled in colour (and Astrometrica pops up a table - which you can ignore). These are known objects for which the program has found a match in the USNO-B1.0 catalogue. The green circles are for stars it has correctly identified in the USNO-B1.0 catalogue, the blue circles are for objects that it hasn't been able to verify but that it believes are stars. Your asteroid should not be circled or might have a grey circle around it.
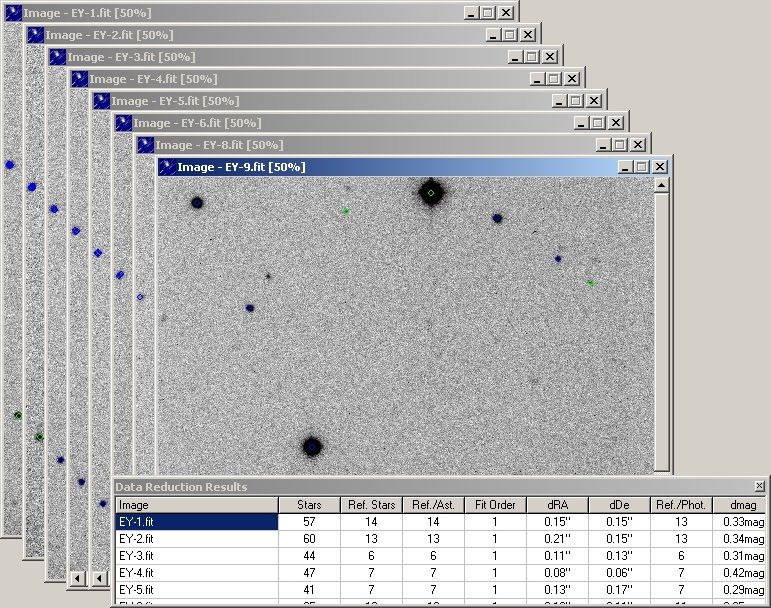
Figure 8: Data Reduction Results.Note: If Astrometrica fails to match the objects between the images and the USNO-B1.0 catalogue, it will pop up a "Reference Star Match Error". Read about what to do if this occurs.
After this matching exercise is complete, Astrometrica knows the exact position of each star in each Faulkes Telescope image, and the exact RA and Dec of each of these stars from the USNO-B1.0 catalogue. This means that Astrometrica now knows the exact RA and Dec of each pixel in each Faulkes Telescope image. You can now use this information to determine the accurate position of the asteroid by selecting its central pixel.
- Verify the asteroid.
Go to the window displaying the first image in the sequence. Move the mouse so your cursor is over the asteroid (you have to remember where it is from the blinking exercise you did earlier) and click on it as close to the centre as possible. This will pop up a new Object Verification window.
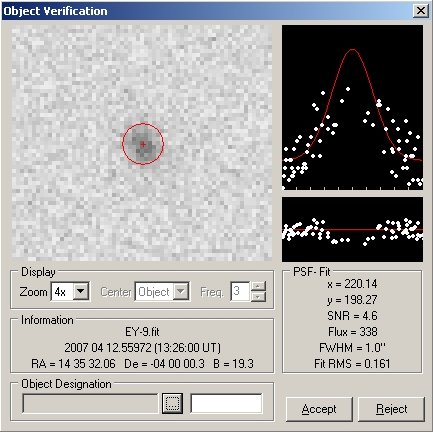
Figure 9: Zoomed in asteroid.This window shows a zoomed-in view of the asteroid. It also gives you a measure of the SNR (Signal-to-Noise Ratio) of your image - this is an indication of the quality of your image. A SNR lower than 4 indicates that the image quality is not good enough to obtain an accurate position for the object and you should think carefully about whether to submit your position to the Minor Planet Centre.
You will note also that the asteroid appears slightly (or very) elongated. This is because the asteroid had been moving while the shutter of the camera taking the image was open. The length of the elongation will depend primarily on two factors:
- the exposure time used
- the speed of the asteroid
If the asteroid is very elongated and it is difficult to ascertain where the actual centre is, you should think carefully about whether to submit your position to the Minor Planet Centre.
In this Object Verification window, the Object Designation field is currently blank. If this is a known asteroid that you are following up (i.e. one you obtained through the Spaceguard Priority List), click on the box beside this field to have Astrometrica identify it. Astrometrica will search the MPCOrb database and pop up another window (Object Identification) containing a list of asteroids in the MPCOrb database that are close to the position of the object you selected.
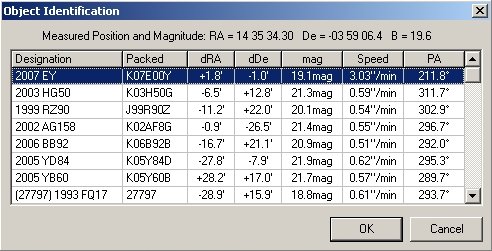
Figure 10: Object Identification.The dRA and dDec show the difference in position between the nearest object in the database and the object you selected. The top entry in this window should be the asteroid you imaged and dRA and dDec should be very close to zero.
If this is the case, click on OK and the Object Designation box will be filled with the details of the asteroid. Then click Accept. Astrometrica will label the asteroid on your image and write the position of the asteroid to an MPC report.
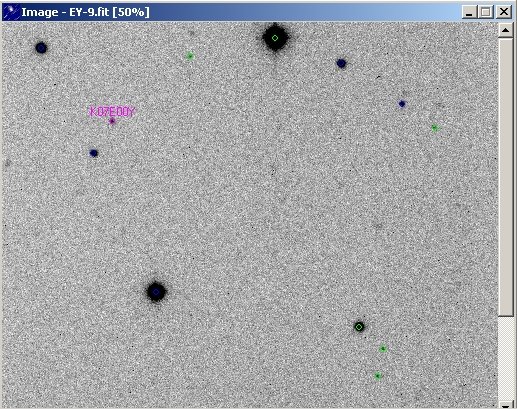
Figure 11: Labelled asteroid.You must repeat this process for each of your images.
- View the MPC Report.
You can view the report written for the Minor Planet Centre and see how the RA and Dec of your asteroid has changed over the course of your observations. Select File » View MPC Report File.

Figure 12: MPC Report.This text file contains the positional information (RA, Dec) about the asteroid at the date and time each Faulkes Telescope image was taken. It also gives an estimate of the brightness (Mag) of the asteroid at that time and indicates the telescope (Tel) used.
- Report your Findings.
Note: You should only report positions of freshly-observed asteroids (not these archive observations).
The UK Faulkes Telescope team has set up a collaborative webpage for all schools pursuing asteroid projects. It is called the Asteroid Portal and can be found at:
http://portal.faulkes-telescope.com/asteroid/
They have also established a procedure for submitting your measured positions through this portal. You must follow these procedures if you wish to submit your findings. Please download the Observing Asteroids using the Asteroid Portal manual from:
http://faulkes-telescope.com/education/projects/asteroids/
and follow the instructions contained in there.
Stacking images to show path of Asteroid
Return to the main page for this module
Exercitationem
Visi ut aliquid ex
Ut enim ad minima veniam, quis nostrum exercitationem ullam corporis suscipit laboriosam, nisi ut aliquid ex ea commodi consequatur.
Visi ut aliquid ex
Quis autem vel eum iure reprehenderit qui in ea voluptate velit esse quam nihil molestiae consequatur, vel illum qui dolorem eum fugiat quo voluptas nulla pariatu
Et harum quidem rerum facilis est et expedita distinctio.